
I’ve spent more time than I’d like to admit standing in front of my kitchen counter, staring at a Belgian endive like it personally wronged me.
The thing is, endive—specifically Cichorium intybus var. foliosum, if we’re being pedantic about it—isn’t actually supposed to be this difficult. It’s a forced chicory cultivar that Belgian farmers developed sometime around the 1850s, give or take a decade, by essentially tricking witloof chicory roots into producing pale, compact leaves in complete darkness. The process involves digging up the roots after the first frost, storing them in cool conditions for roughly three weeks to break dormancy, then replanting them in sandy soil inside lightless cellars or specialized forcing rooms held at around 60-65°F. What emerges are those torpedo-shaped heads of tightly packed leaves, blanched to a creamy white-yellow because photosynthesis never got a chance to kick in. The bitterness—that distinctive, almost medicinal edge—comes from sesquiterpene lactones, compounds the plant produces as a defense mechanism that happen to taste absolutely terrible to most insects and, apparently, to anyone who hasn’t aquired the taste yet.
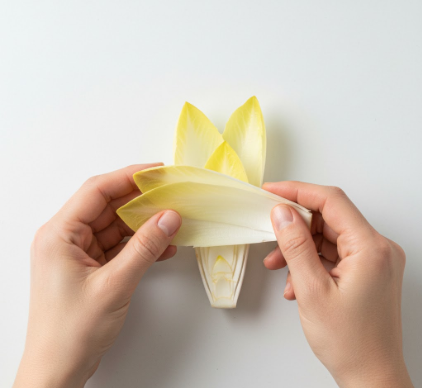
Here’s the thing, though: separating those leaves without turning them into a mangled mess requires a kind of patience I don’t always have. You’re supposed to slice off maybe a quarter-inch from the base—just enough to loosen the outer leaves—then peel them away one by one, working your way inward like you’re disassembling something fragile and vaguely architectural.
Wait—maybe I’m overthinking this, but there’s actually some science behind why this matters beyond aesthetics.
The Structural Engineering of a Vegetable That Grows in the Dark and Doesn’t Apologize for It
Belgian endive heads are constructed with an almost suspicious level of geometric precision. Each leaf overlaps the next in a tight spiral pattern—botanists call it a “chicon” in French, which sounds fancier than it deserves—and that arrangement serves a purpose beyond making your salad look Instagram-worthy. The compact structure protects the inner leaves from oxidation and mechanical damage during transport, which is why imported endives can survive a transatlantic journey and still look relatively pristine when they arrive at your grocery store, usually shipped in those blue tissue-paper wrappings that I always feel guilty throwing away. When you separate the leaves correctly, you preserve their natural curve and structural integrity, which matters if you’re using them as edible vessels for appetizers—those little boats filled with herbed goat cheese or smoked salmon that show up at every moderately upscale gathering I’ve attended since roughly 2008. Damage the leaf during separation and it loses its ability to hold fillings without collapsing into soggy disappointment.
I used to just hack at the base with a paring knife and wonder why half the leaves came out bruised.
The Practical Mechanics of Not Destroying Your Ingredient Before You Even Start Cooking With It
Turns out there’s a whole methodology here that professional chefs have been using forever but somehow never made it into the standard home-cooking repertoire, at least not in any cookbook I owned before I started actually paying attention. First, you need to acknowledge that the core—that dense, white column running through the center—is both the structural anchor and the main source of bitterness. Some recipes tell you to cut it out entirely, which seems wasteful and also kind of defeats the point of eating endive in the first place, but if you’re serving it raw to people who claim they “don’t like bitter things,” removing a thin wedge of the core from each separated leaf can make it more palatable without completely neutering the flavor. The separation process itself works best if you’ve rinsed the whole head first under cold water—not soaking it, which waterlogs the leaves and makes them limp, but a quick rinse to remove any soil or debris that might’ve gotten trapped during forcing. Then you make that initial cut at the base, perpendicular to the axis of the head, just deep enough to sever the point where the leaves attach but not so deep that you’re cutting through half the chicon. After that it’s a matter of applying gentle, even pressure as you peel each leaf away, working with the natural curve rather than against it, which honestly feels a bit like therapy if you’re in the right mindset or incredibly tedious if you’re not.
I guess it makes sense that a vegetable this finicky would require finicky handling.
Anyway, once you’ve got your separated leaves, you can store them in a damp paper towel inside a sealed container for maybe two days before they start to brown along the edges—oxidation is relentless, even with vegetables that spent their entire growing period in darkness—or you can use them immediately in preparations that range from the painfully simple (raw with a sprinkle of sea salt and a squeeze of lemon) to the unnecessarily elaborate (braised in brown butter with thyme and finished with a balsamic reduction, which I saw someone do once at a dinner party and honestly couldn’t tell if it was genius or just showing off). The leaves themselves contain about 95% water by weight, trace amounts of vitamins A and K, and enough fiber to be respectable without being medicinal, though none of that really matters if you’ve already decided you hate the taste, which is fair—bitter isn’t for everyone, and I’m deffinately not going to judge anyone who picks around the endive in their winter salad and goes straight for the candied walnuts instead.


